Sometimes you may need to know the speed, memory type of the RAM you have installed in your system. It's relatively easy if you can open the case yourself without any professional help but if you can't then there are plenty of easier options available in Windows 10.
The easiest option to determine your system memory type is to check via Task Manager. But in few cases, the Task Manager may fail to determine your system's RAM configuration. In that case, you can use Command Prompt or a third party program.
This tutorial will show you three different ways to determine your systems' RAM configuration. Continue reading to know more:
To Determine RAM Configuration via Task Manager
It's the easiest options of the three. Follow the following simple steps.


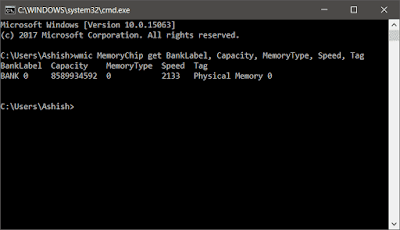
The above table instructs the value, and each value determine different type of RAM. In the Command Prompt, after applying the above command, you'll see the above value in the Memory Type table. The speed tab determine the RAM speed -in MHz.
 |
Source: Alpha Coders
|
The easiest option to determine your system memory type is to check via Task Manager. But in few cases, the Task Manager may fail to determine your system's RAM configuration. In that case, you can use Command Prompt or a third party program.
This tutorial will show you three different ways to determine your systems' RAM configuration. Continue reading to know more:
To Determine RAM Configuration via Task Manager
It's the easiest options of the three. Follow the following simple steps.
- Open Task Manager in More Details view.
- Click on the Performance tab, and then click on Memory.

- You can see the RAM size and its type in the top right corner of the window.
- In the bottom row, you will see the speed, and the number of slots used.
In some cases, the Task Manager will not show the RAM type of your PC/Laptop. You can use the command line to determine it. Follow the following steps to check it via Command Prompt.
To Determine RAM Configuration via Command Prompt
To Determine RAM Configuration via Command Prompt
- Open a Command Prompt window.

Tip: To open a Command Prompt window: Open the Run dialog box by pressing Win + R, then type cmd.exe and click OK.
- Enter the command given below to know the full details:
wmic MemoryChip get BankLabel, Capacity, MemoryType, Speed, Tag
- You can now see the details of your Memory Type. See the image attached above.
The table given below shows the value and the memory types it denotes.
Value
|
Type of Memory
|
|---|---|
| 0 | Unknown |
| 1 | Other |
| 2 | DRAM |
| 3 | Synchronous DRAM |
| 4 | Cache DRAM |
| 5 | EDO |
| 6 | EDRAM |
| 7 | VRAM |
| 8 | SRAM |
| 9 | RAM |
| 10 | ROM |
| 11 | Flash |
| 12 | EEPROM |
| 13 | FEPROM |
| 14 | EPROM |
| 15 | CDRAM |
| 16 | 3DRAM |
| 17 | SDRAM |
| 18 | SGRAM |
| 19 | RDRAM |
| 20 | DDR |
| 21 | DDR2 |
| 22 | DDR2 FB=DIMM |
| 24 | DDR3 |
| 25 | FBD2 |
| 26 | DDR4 |
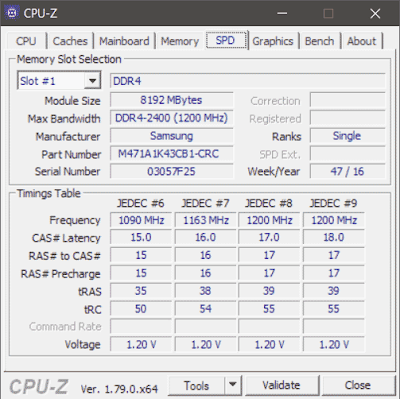
If for some reason, the Command Prompt fails to determine your system Memory Type or if it shows the value as 0 then you can use CPU-Z.
To Determine RAM Configuration via CPU-Z
If you prefer GUI then try using CPU-Z. You can download the application from here. Download the ZIP file if you prefer using a portable version.

Comments
Post a Comment