If you have a Blogger blog and you would like to migrate your blog to WordPress than you can do it quite easily. Blogger is a cool blogging platform and offers lots of features that is enough for peoples who just want to share their blogging experience. And the positive point of Blogger is that it is free and you can monetize your blog and earn money without paying a penny to Blogger. But their are some negative points of Blogger too. Google's Blogger will own your blog and they can remove your blog if they find it full of spams. Although, Blogger is simple to use but you might get difficulties in managing your widgets and creating your navigation menus But with self hosted WordPress blog, you will own your blog and you can manage your widgets and everything very easily.

In this post I will show you how to migrate from Blogger to WordPress without losing any page-rank. You will redirect your blog with 301 permanent redirection. After migration we will be able to achieve 301 redirection with no or very low 404 error pages.
Some of the things which we will be changing following things.
- Importing your Blogger posts, comments and users to WordPress.
- Redirecting your blog visitors to your new WordPress blog.
- Maintaining 301 permanent redirection.
- Maintaining labels pages URL to look just like the Blogger label URL.
- Maintaining your blog feed subscribers.
Important: Install your WordPress in your root directory. For eg. your homepage is www.example.com rather than www.example.com/my-blog.
Now follow these steps to migrate your Blogger blog to self hosted WordPress blog without losing any traffic and Search Engine Ranking.
- At first log-in to your WordPress dashboard.
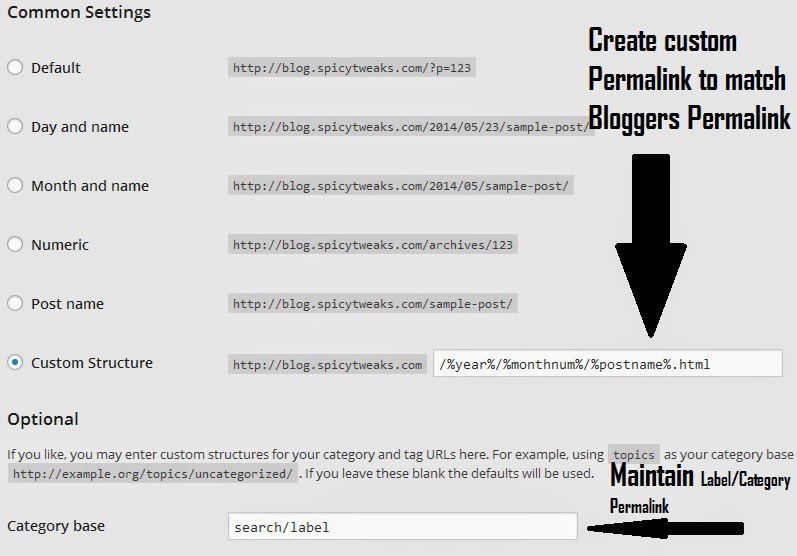
- After that navigate to Settings > Permalink.

- Now in the Common Settings, create a custom permalink structure to match with the Blogger permalink. Just add the following permalink code in the custom structure text field.
/%year%/%monthnum%/%postname%.html
- Now we will change the permalink structure for the category/labels page. In the Optional tab you will see Category base, now add the following permalink structure in the given text area.
search/label
- We have changed the permalink structure of the WordPress blog to match with the Blogger link structure.
You are now ready to import your Blogger posts to your WordPress Blog. Follow the following steps to import blog posts.
- Navigate to Tools > Import. After that choose Blogger from the given options.
- It will ask you to install the importer plugin. Just install and activate it.
- Now click on authorize button. After clicking authorize button you will be redirected to Google Request for Permission page.

- After granting access, you will be redirected back to your WordPress blog where you will see all your blog which is hosted in Blogger.

- Click Import button to start importing your Blogger posts to your WordPress blog.
Great! We have now imported your Blogger posts to WordPress blog. Wait! We have not set the 301 permanent redirection until now. Now its time to setup redirection for your blog. Follow the below given steps very carefully.
- Log-in to your Blogger account and click on the blog on which you want to setup redirection.
- Now navigate to Dashboard > Template.
- In the Template page, keep scrolling down until you're on the bottom of the page.
- In the very bottom you will see an option Revert to Classic Blogger Template.

- After reverting to classic templates, add the following lines of codes in the HTML content of your blog.

- Add the following code in the HTML content.
<!DOCTYPE html PUBLIC "-//W3C//DTD XHTML 1.0 Strict//EN" "http://www.w3.org/TR/xhtml1/DTD/xhtml1-strict.dtd"> <html xmlns="http://www.w3.org/1999/xhtml" xml:lang="en" lang="en" dir="<$BlogLanguageDirection$>"> <head> <title><$BlogPageTitle$></title> <script type="text/javascript"> <MainOrArchivePage> window.location.href='http://blog.spicytweaks.com/' </MainOrArchivePage> <Blogger><ItemPage> window.location.href='http://blog.spicytweaks.com/blogger/?q=<$BlogItemPermalinkURL$>' </ItemPage></Blogger> </script> <MainPage><link rel="canonical" href="http://blog.spicytweaks.com/" /></MainPage> <Blogger><ItemPage> <link rel="canonical" href="http://blog.spicytweaks.com/<$BlogItemPermalinkURL$>" /> </ItemPage></Blogger> </head><body> <div style="border:#ccc 1px solid; background:#eee; padding:20px; margin:80px;"> <p>This page has moved to a new address.</p> <h1> <MainOrArchivePage><a href="http://blog.spicytweaks.com"><$BlogTitle$></a></MainOrArchivePage> <Blogger><ItemPage> <a href="http://blog.spicytweaks.com/<$BlogItemPermalinkURL$>"><$BlogItemTitle$></a> </ItemPage></Blogger> </h1> </div> </body></html> <!-- replace example.com with your WordPress site URL --->Important: Replace http://blog.spicytweaks.com with your WordPress blog URL. Don't forget this.
- Now you can save your template.
Now for the WordPress side. See the steps given below.
- Create a text file and save it as php format. You can name it as blogger2WP.php. Add the following codes in your PHP/text file upload it to the root directory of your blog through any FTP client.
<?php
 /*
  Redirection powered by spicytweaks.com
 */
 global $wpdb;
 $old_url = $_GET['q'];
 if ($old_url != "") {
// Fix for blogger blogs with .de and other tlds in their URLs
$tld_fix = preg_replace("/blogspot.[a-zA-Z0-9]+/", "blogspot.com", $old_url);
$permalink = explode("blogspot.com", $tld_fix);
   $q = "SELECT guid FROM $wpdb->posts LEFT JOIN $wpdb->postmeta ".
        "ON ($wpdb->posts.ID = $wpdb->postmeta.post_id) WHERE ".
        "$wpdb->postmeta.meta_key='blogger_permalink' AND ".
        "$wpdb->postmeta.meta_value='$permalink[1]'";
  $new_url = $wpdb->get_var($q)? $wpdb->get_var($q) : "/";
  header ("HTTP/1.1 301 Moved Permanently");
  header("Location: $new_url");
 }
?>
- Save the above file as .php format and upload it to your public-html/root directory. You can use free FileZilla FTP client to upload this file to your root folder.
To migrate your feed subscribers, you can add the new feed URL using Blogger settings. Navigate to Dashboard > Settings > Site Feed. Now add a new site feed redirect URL.
That's All! If you have followed the above show steps carefully than you have successfully migrated your Blogger blog to your new self hosted WordPress blog. If you face any problem than feel free to drop a comment below.
Get daily ideas and methods for earning THOUSANDS OF DOLLARS per day FROM HOME totally FREE.
ReplyDeleteJOIN FOR FREE